Blog · By The Packaging Vista Team · June 20, 2026
Bleed & Safe Zone: Setting Up Print-Ready Box Artwork
Bleed and safe zones are the two artwork margins that keep custom printed product boxes looking clean: no white slivers at the edge, no text trimmed off. They are the difference between artwork that prints crisp and artwork that comes back with a hairline of bare board along one side.
This guide goes deeper than the setup section of our main artwork and dieline guide. It explains each line on the dieline, how much bleed to allow, and how to lay out a box so it presses correctly the first time.
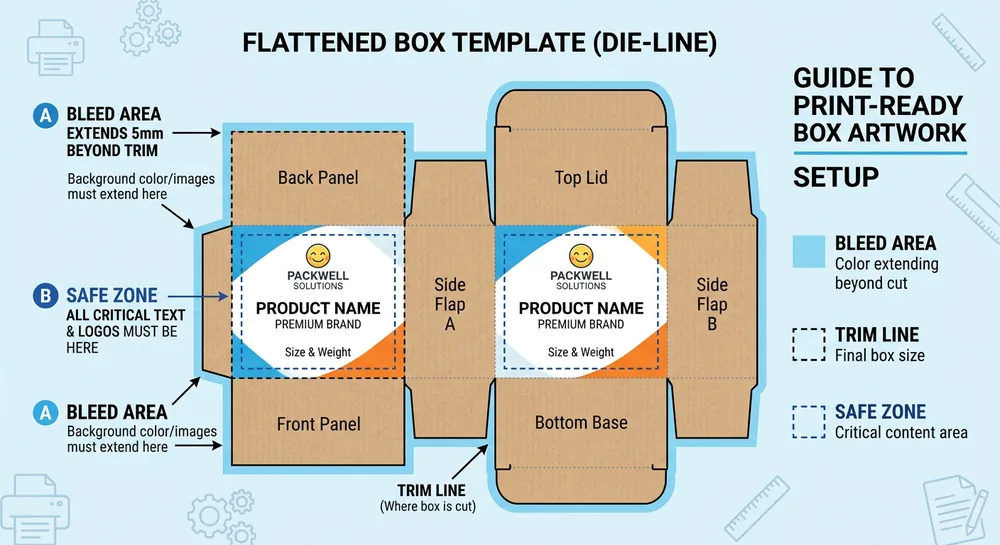
The three lines on every dieline
- Trim line – where the box is cut, the finished edge of the panel.
- Bleed – background art extended past the trim (commonly about 0.125″) so no white shows if the cut shifts slightly.
- Safe zone – an inner margin where you keep logos and text, so nothing important sits near the cut.
Think of them as outer, edge, and inner boundaries: art runs out to the bleed, the press cuts at the trim, and your critical packaging design content lives inside the safe zone so custom printing lands clean.
Why bleed and safe zones exist
No cutting or folding process is perfect to the thousandth of an inch. Sheets shift a hair during printing, dies register a touch off, and folds land slightly differently across a run. Bleed absorbs that movement on the outside so a stray white edge never appears, and the safe zone absorbs it on the inside so a logo never gets sheared.
Without them, even a tiny, normal variance turns into a visible defect on a finished box.
How much bleed to allow
About 1/8″ (0.125″) of bleed is standard for boxes. Extend any background color or image all the way to the bleed line – never stop it exactly at the trim, or a slight cut shift will leave a white edge. If your design has a solid background color, pull that color past every trimmed edge.
For images, make sure the photo contains image data out to the bleed rather than fading to white right at the cut.
Keep content in the safe zone
Pull logos, text, barcodes, and anything you cannot afford to lose inward, away from the trim – especially near folds and edges. A good habit is to keep critical content at least 1/8″ inside the trim, and a little further from fold lines and glue tabs, which take the most movement. The rule of thumb is simple: background runs to the bleed, important content stays inside the safe zone.
Watch the folds, panels, and glue tabs
Boxes are not flat sheets – they fold into panels, and art that looks centered flat can end up wrapping a corner or hiding under a glue flap once assembled. Keep type off fold lines so letters do not crack or distort at the crease, and never place essential content on tabs that get glued or tucked out of sight.
Working from a proper dieline shows you exactly where each panel sits before you commit. See dieline templates for where artwork goes on each face of the box.
File setup that presses clean
A few setup habits prevent most problems: build artwork at the correct finished size with bleed added on every side, keep text as live vector or properly outlined fonts, and supply images at print resolution rather than low-res web files. Set color in a print model rather than screen RGB so the proof matches the press – our CMYK vs.
Pantone guide explains how to lock a brand color. For the difference between sharp vector and pixel-based art, see our vector vs. raster guide.
A simple checklist before you send artwork
Before handing off a print file, run through a quick mental checklist so nothing trips the press:
- Bleed added? About 1/8″ of background extends past every trimmed edge.
- Content pulled in? Logos, text, and barcodes sit inside the safe zone, away from trims and folds.
- Built on the dieline? Artwork is placed on the correct die so each panel lands where you expect.
- Print color, not screen? Files are set up in a print color model, with brand colors specified – see our CMYK vs. Pantone guide.
- Resolution good? Images are high-resolution print files, not low-res web graphics.
Catching these before submission saves a revision cycle and gets your boxes to press faster.
How bleed and safe zones differ from product to product
The same principles apply to every structure, but the details shift with the box. A simple folding carton has straightforward flat panels, while a premium rigid setup box wraps printed paper around board, so art has to account for the wrap and the turn-in at the edges. Mailer and corrugated boxes fold into many panels with glue tabs, so keeping content well inside the safe zone matters even more.
Window boxes add a die-cut opening that your artwork must clear. Whatever the structure, building on the right dieline shows you exactly where bleed, trim, and safe zones fall for that specific box – which is why we supply one with every order.
| Line | Typical distance | What lives here |
|---|---|---|
| Bleed | ~0.125″ past trim | Background color and images only |
| Trim | Finished box edge | Where the die cuts the panel |
| Safe zone | ~0.125″ inside trim | Logos, text, barcodes |
| Fold clearance | ~0.1875″ from crease | Keep type off folds |
| Glue-tab clearance | Full tab area | No visible artwork – gets glued |
Not set up to do this?
Our free design team handles bleed and safe zones for you – just send a logo and a brief, and we lay the artwork out on the correct dieline, press-ready. As a US-based supplier, we proof the layout before printing so you can confirm placement, and there are no die or plate fees on the dieline we build. This is the easiest path if you are not comfortable preparing print files yourself.
Frequently asked questions
How much bleed does a box need?
About 1/8″ (0.125″) on every edge is the standard. Extend background color and images all the way to that bleed line so no white shows if the cut shifts.
What happens if I forget the bleed?
A slight, normal shift in the cut can expose a thin white edge of bare board. Adding bleed prevents it, which is why we check for it before printing.
Where should I keep my logo and text?
Inside the safe zone – pulled in from the trim and away from folds and glue tabs – so nothing important sits where it could be cut or distorted.
Can you set up bleed and safe zones for me?
Yes. Send your logo and brief and our free design team will lay everything out on the correct dieline and send a proof to approve before printing.
What is bleed in packaging print?
Bleed is background art extended past the trim line – commonly about 1/8″ (0.125″) on every edge. It exists because no cutting process is perfect. A slight shift on press would leave a white sliver at the edge without it. Extend any background color or image all the way to the bleed so the finished box shows no bare board.
Why is a safe zone important on box artwork?
The safe zone is an inner margin where you keep logos, text, barcodes, and anything you cannot afford to lose. Dies register a touch off and folds land slightly differently across a run. If a logo sits right at the trim or over a fold, a normal variance can shear it or crack the type. Pulling critical content inward absorbs that movement.
How does bleed differ from the safe zone?
Bleed is outside the trim – where background art extends past the cut so no white edge shows. The safe zone is inside the trim – where you keep important content well away from the cut and folds. Together they set outer and inner boundaries. Background art runs to the bleed. Critical content stays inside the safe zone.
What is the difference between bleed, trim, and safe zone?
The trim is where the box is cut – the finished edge of the panel. Bleed is background art extended about 1/8″ past the trim so no white shows if the cut shifts. The safe zone is an inner margin (also about 1/8″) where logos and text live so nothing important sits near the cut or a fold. Every dieline shows all three lines.
Get print-ready artwork
Send what you have and we will make it press-ready, with bleed and safe zones handled for you and a proof before anything runs. Start with our artwork guide, then request your free quote or contact our team.