Blog · By The Packaging Vista Team · June 23, 2026
Product Launch Packaging Checklist: Sample to Shelf
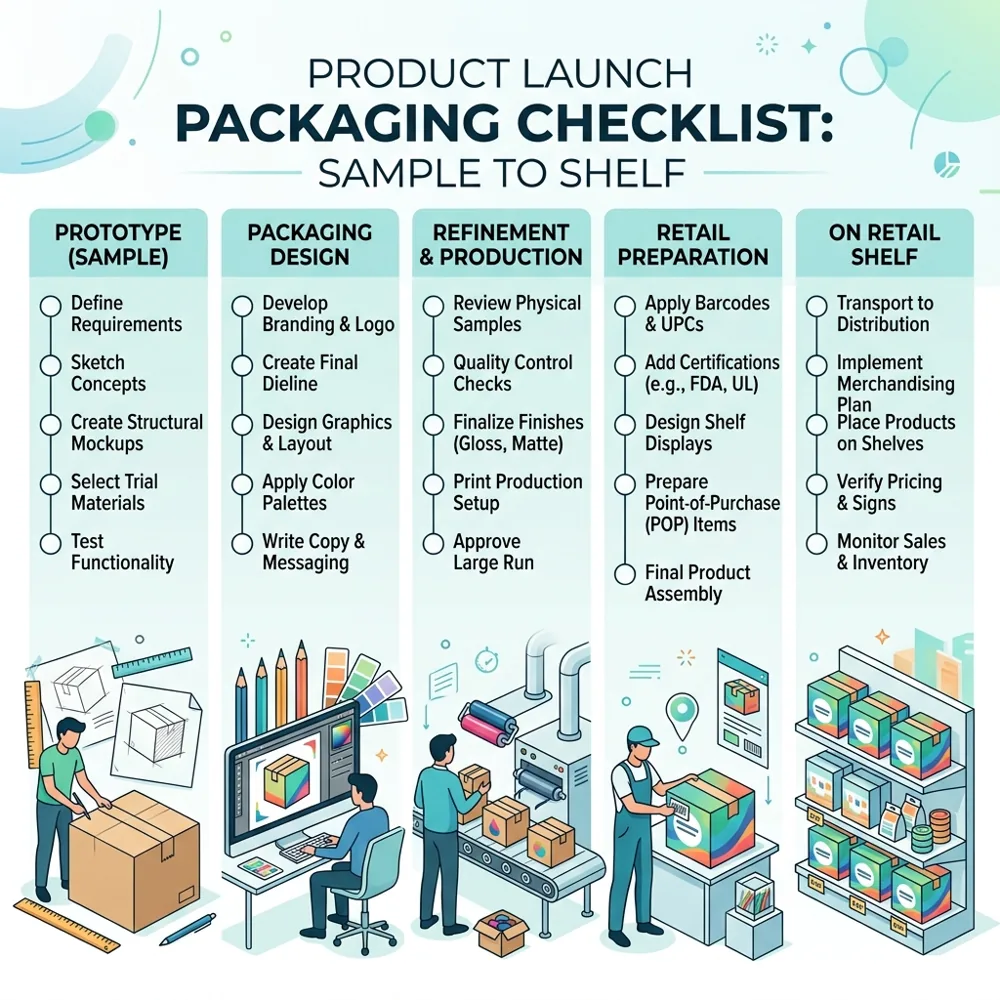
Packaging is one of the last things new brands plan and one of the first things customers judge – so build it into your launch timeline early. This product launch packaging checklist walks you from measuring your product to holding a finished box, with realistic timing so nothing blocks your launch date. Whether you are a solo founder or a growing team, treating packaging as a project with clear steps – not an afterthought – is what keeps custom packaging for startups on schedule and on budget.
The quick checklist
- Measure your product and pick a box style
- Choose the right material
- Approve a dieline and artwork
- Review a digital proof, then a physical sample
- Confirm MOQ, budget, and turnaround
- Place the order with buffer time before launch
Step 1 – Measure and size the box
Start with the product, not the box. Measure length, width, and height, and decide whether it ships on its own or sits on a shelf. Our guide on how to measure for a custom box walks through it, and box styles explained helps you pick mailer, tuck-end, or rigid.
Step 2 – Choose the material
Match material to the job: corrugated for shipping and protection, paperboard for printed retail cartons, rigid for premium unboxing, kraft paper box stock or eco stocks for a natural, sustainable look. Compare them in our packaging materials guide.
Step 3 – Dieline and artwork
A dieline is the flat blueprint your print sits on. Get a free, correctly-sized dieline before designing, and set up artwork with bleed and safe zones so nothing critical gets trimmed. See dieline templates and bleed and safe zones.
Step 4 – Proof, then physical sample
Always approve a digital proof, then a physical sample. A screen cannot show how a finish feels or how color shifts on kraft. Holding the real box is the single best way to avoid a costly full-run mistake.
Step 5 – MOQ, budget, and turnaround
Confirm the minimum order, any plate or die fees, and the production turnaround in writing. Low minimums let you launch lean and reorder on real demand. See low-MOQ packaging and packaging costs.
A realistic timeline
| Stage | Typical time |
|---|---|
| Dieline + artwork | 2–5 days |
| Digital proof + sample | 3–7 days |
| Production | 8–10 business days |
| Free US shipping | Included |
Build in a buffer: start packaging ~4–6 weeks before launch so a revision never delays your date.
Align packaging with the rest of your launch
Packaging does not happen in isolation – it has to land in step with your inventory, photography, and store. Coordinate the box delivery with the date your filled product is ready so you are not assembling units the night before launch. Order one extra short run or a few hand-assembled samples early for product photography and social content, because polished unboxing shots often need to be live before the product itself ships. If you sell direct-to-consumer, make sure the box dimensions and weight are loaded into your shipping platform so rates are accurate from day one. Thinking of packaging as one workstream inside the larger launch plan prevents the classic mistake of beautiful boxes arriving after the campaign has already gone out.
Plan for the reorder, not just the launch
The first run gets all the attention, but the smartest founders design with the second run in mind. Keep your dieline and artwork files organized and named clearly so a reorder is a one-line request rather than a rebuild. Leave space on the structure for variables you will add later – new shades, flavors, sizes, or seasonal art – so the same box family stretches across your catalog. Because there are no die or plate fees and the minimum stays at 100, you can launch lean, learn from real sales, and refine a version two without writing off a warehouse of v1 boxes. That iterative approach is exactly what low minimums are for.
Budget the whole packaging picture, not just the box
New founders often quote themselves only the per-box price and get surprised later. A realistic packaging budget includes the printed carton, any insert or void fill, an outer shipper if your retail box is not ship-ready, and the cost of a sample round before the full run. The good news is that several common cost traps do not apply here: there are no die or plate fees, and the minimum is 100 boxes, so you are not forced into a large run to make the economics work. Pricing is quote-based, which means it reflects your exact size, material, and finishes rather than a one-size-fits-all sheet. If you want to trim cost without cutting quality, right-sizing the box and simplifying finishes are the two biggest levers – our guide on how to reduce packaging costs covers more, and setup fees explained shows where hidden charges usually hide.
Get the artwork files right the first time
A surprising share of launch delays trace back to artwork that was not print-ready. Supply your design as vector art wherever possible, build it on the supplied dieline, include bleed past the trim, and keep critical text inside the safe zone so nothing important is cut off. Confirm whether your brand colors are being matched as process (CMYK) or spot colors, since that affects how consistent they look across reorders. Getting these technical details right before you submit means the proof comes back clean and you avoid a round of revisions that eats into your timeline. Our free design support exists for exactly this reason – if you are unsure about file setup, send what you have and we will help prepare it.
Common launch mistakes
- Designing artwork before you have the dieline (it rarely fits).
- Skipping the physical sample to save a few days.
- Over-ordering a v1 design you will likely revise.
- Choosing an oversized box and paying dimensional weight on every parcel.
Frequently Asked Questions
How early should I start packaging for a launch?
About 4–6 weeks out. That covers dieline and artwork, a proof and physical sample, production, and a buffer for one revision.
Do I need a dieline before designing?
Yes. The dieline is the exact flat shape your artwork sits on. Designing first usually means redoing the art once the real dieline arrives.
What is a good first-order quantity?
Start low – around 100 units – so you can launch, gather feedback, and reorder or revise without sitting on a large run of a v1 design.
Should I get a physical sample?
Always. A sample shows true color, finish, and fit, and is the cheapest insurance against a costly full-run error.
Launching soon? Request a free quote and we will size the box, build a free dieline, and send a sample so your packaging is ready before your launch date. Have questions first? Contact our team.